A post about pizza from The Life Ain’t Cheap Project, my other blog about frugal vegan food…
Makes 4 pizzas to feed 4 hungry people
Prep time: 1 1/2 hours including dough rising time
The day I learned that there exists a traditional type of pizza from Naples that has no animal ingredients was the day I knew I would remain a happy vegan forever. Who needs cheese on your pizza anyway?
Pizza marinara is made with nothing but tomatoes, basil, garlic and oregano, and if you get it right there is nothing like it on earth. You certainly don’t want to be messing up those sublime flavours with a pile of rubbery soy cheese.
Perfecting my pizza marinara has been an ongoing project for a few years now. I have spent embarrassingly long stretches of time watching Youtube videos of Neapolitan pizzaioli (pizza chefs) doing their virtuouso thing, shaping the dough, dressing the pizzas and shunting them into the wood-fired oven with style.
After a couple…
View original post 1,143 more words
Serves 10-12
Prep time: 50 minutes

Bird’s custard powder is vegan!
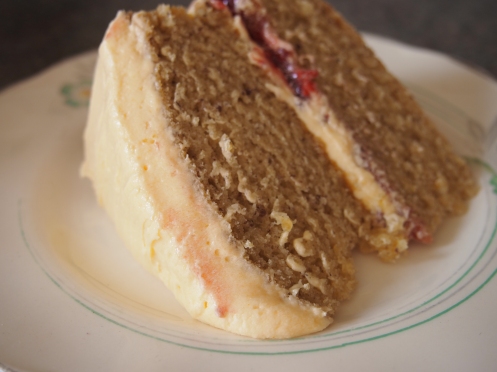
I had to celebrate this simple and happy fact by making a cake. Custard powder in a cake is a wonderful wonderful thing. I can’t quite describe what the flavour is but it definitely has a strong nostalgic quality, taking you right back to your seventh birthday party when you slipped over in a puddle of blackcurrant squash while playing off ground tag.
The sponge in this cake is really moist, fluffy and flavourful, and a snap to put together. The ingredients are pretty straightforward too. The sponge is slightly flecked because I used ground flaxseeds as a binder. If you wanted a lighter, more uniform colour you could use egg replacer instead.
There’s also a layer of raspberry jam which seems to taste just right in among all the custardiness. If you were feeling all sophisticated, like, you could immerse kirsch-soaked cherries in the middle layer instead. I bet that would be ni-i-i-ice.
By the way, you may or may not have noticed that I haven’t posted here for a while. I’ve been concentrating on building up my other blog, Happy Vegan Belly, where I am posting healthy, gluten-free, sugar-free recipes with lots of veggies and freshness. However, after much soul-searching and dietary experimentation I still believe there is a place in my life for the occasional slice of cake or hunk of fragrant, freshly baked bread – as long as I take it easy and choose what I eat with care – so you will still be finding a few indulgent recipes here at Vegan Bellyful 🙂
Speaking of which, please allow me to introduce:
Vegan custard sponge cake (not gluten free, not sugar free, but definitely vegan)
Ingredients
For the sponge:
Plain flour, 225g
Caster sugar, 250g
Vegan custard powder, 3 tbsps
Baking powder, 2 tsps
Bicarbonate of soda, 1/2 tsp
Salt, 1/2 tsp
Soy milk, 225ml
Vegetable oil such as rapeseed, 80ml
Apple cider vinegar, 1 tbsp
Vanilla extract, 1 tsp
Two flax eggs (2 tbsps ground flax seed + 6 tbsps water, stirred together and left in fridge for 20 minutes to thicken)
Raspberry jam, 2 heaped tbsps
for the buttercream:
Icing sugar, 200g
Vegan margarine, 110g
Custard powder, 3 tbsps
Preheat the oven to 180C. Grease and line two 20cm/8 inch sandwich tins. Get your flax egg mixed and sitting in the fridge. Mix the vinegar with the milk and set to one side to thicken.
Sieve the flour, bicarbonate of soda, baking powder, custard powder and salt into a large bowl.
When the milk and vinegar has curdled whisk in the oil, sugar, flax eggs and vanilla extract. Add the wet ingredients to the dry and stir gently with a spatula until everything is mixed. Pour the batter into the tins.
Bake for 25 minutes until risen and golden and until a toothpick inserted into the middle comes out clean.
Let the cakes cool in their tins for 5-10 minutes before turning out on to a rack to cool completely.
To make the icing, beat all the ingredients together (easiest with electric beaters, otherwise use a wooden spoon).
When the cakes are cool spread the jam over one half, then top with about one-third of the buttercream. Sandwich the layers together and spread the remaining buttercream over the top.
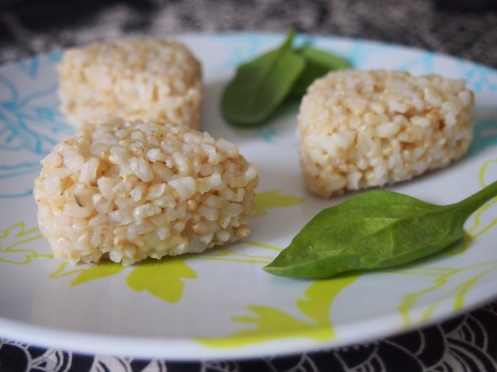
Brown rice onigiri: the newest recipe on my new food blog, http://www.happyveganbelly.com (come hither…)
I just wanted to let you know that I probably won’t be posting much on this blog any more. The reason is that I’ve had something of a diet-related epiphany, which led to a complete overhaul of my approach to cooking and eating. I felt that I had to wipe the slate clean blog-wise, too, and abandon the bellyful feeling once and for all…
Once upon a time there was a lonely vegan blogger who didn’t know any other vegans and sometimes felt as if she was the only one in the whole land. This vegan blogger liked to cook nice food and post the recipes on her website, in the hope that other vegans out there might notice and say, ‘Oh look! Another lonely vegan. Let’s be friends!’
On her blog there was lots of yummy pastry and pasta and sugary treats. She made a rich chocolate torte for Christmas, and juicy seitan burgers out of the purest gluten.
But one day this blogger started noticing that things weren’t right in her tummy.
Anyway, this is a food blog and so you probably don’t want any more detail about my burbly tum. It could get rather offputting. Suffice to say it all turned out well in the end.
The vegan blogger identified the baddies that had been causing her all those nasty problems, and so she revitalised her whole way of eating with healthy oils and whole grains and nuts and magic beans and lovely crisp veggies that were every colour of the rainbow.
Then, of course, she had to revitalise the blog, which henceforth would no longer be known as veganbellyful.com since she had said goodbye to that nasty, evil, gurgling bellyful feeling with the sulphurous burps straight from the pits of Hell… (stop that now)
She even found one or two vegan friends, so she didn’t feel so lonely any more. She didn’t find a Prince Charming but that was because she’d already found him. And he is quite charming, even if he does eat McDonald’s Breakfast Wraps three times a week.
This not-so-lonely, not-so-burbly vegan blogger hopes that you’ll stop by her new blog at happyveganbelly.com every once in a while and check out my food. And if you want to peruse the kind of food that got me into this trouble in the first place – tasty, yes! and very bready! – please feel free to peruse the site you’re on now.
See you again soon at happyveganbelly.com!
Jennie 🙂
Serves 2-3
Prep time: one hour
Here begin my adventures in the land of Gluten Free. And do you know, they’re not off to a bad start.
Amaranth can be a confusing grain to work with as it behaves slightly differently from its more familiar cousin, quinoa. I must admit, it took me a while to get round to trying it as I never heard very good things about it. ‘Texture like caviar’… oh dear. ‘Defies all attempts to construct a pilaf’… hmm.
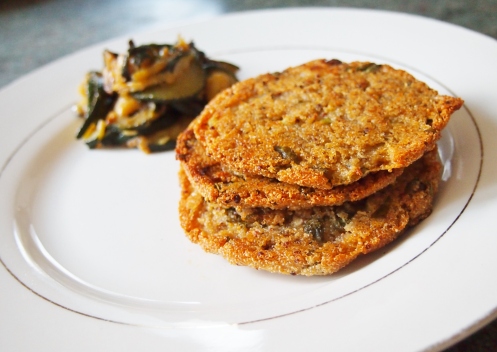
However, it is highly recommended for the gluten free diet and for vegans, thanks to its rather formidable amino acid profile. And even though it makes the gloopiest porridge imaginable (which may be appetising to some people – not me though) it also crisps up beautifully with a bit of oil and heat applied either in a frying pan or in the oven.
These amaranth cakes turned out so deliciously crunchy that it’s got me thinking about future experiments, such as whether amaranth would make a passable gluten-free crumb crust instead of panko. I will report back shortly.
In the meantime, I would recommend eating these with a nice soft vegetable concoction as a contrast to the crunch. I slow-fried courgettes in the Hugh Fearnley-Whittingstall manner until they caramelised and went all nice and, you know, appetising like.
So there we are. Week one of gluten-free eating. So far, so pretty bloody good.
Amaranth cakes with slow-caramelised courgettes
Ingredients
Amaranth, 1 cup
Vegetable stock, 2 cups
Four spring onions, finely sliced
Gram flour, 2 tbsps
Basil, one large handful, roughly chopped
Nutritional yeast, 4 tbsp
Zest of one lemon
Wholegrain mustard, 1 tbsp
Salt and pepper
Olive oil, for drizzling
For the courgettes:
Three courgettes / zucchini, finely sliced
Garlic, two cloves, crushed
Salt and pepper
Olive oil, 1 tbsp
Preheat the oven to 200C.
Cook the amaranth in the stock, according to packet instructions. In my experience, the rice method seems to work well: simmer slowly in twice the volume of water or stock, with the lid on, until the water is absorbed and the amaranth has turned into a sticky porridge. This will take around 25 minutes.
Make the courgettes: heat the oil in a pan and tip in the courgettes and garlic. Lightly season with salt. Fry slowly over a gentle heat for about half an hour, stirring occasionally. As the courgettes soften, break them up with a wooden spoon, until you have an unctuous caramelised mess.
When the amaranth is done, let cool until you can handle it without burning your fingers. Mix in the rest of the ingredients. Lightly oil a baking sheet and, with wetted hands, form the amaranth mixture into six patty shapes.
Arrange on the baking sheet and drizzle with more olive oil.
Bake for 20 minutes, flip and bake for a further ten minutes. Let cool for 10 minutes or so before serving.
Serves 4 generously
Prep time: 1 hour or 2 1/2 in a slow cooker

Without wanting to go into too much detail (this is a food blog, after all) I’ve had a bit of the old tummy trub lately.
It’s been going on for quite a few months now and I have an awful feeling it may be something to do with wheat. A quick look at the type of recipes I put on this blog should tell you how much of a disaster that would be.
However. Tis far from decided yet. I’m cutting out gluten temporarily to see what difference it makes. And I am comforting my poor bowling-ball belly with modest servings of soft, reassuring pap.
This is exactly what kitchari is perfect for: vegan hypochondriacs with problematic guts. According to Ayurvedic medicine, this dish – the Indian forerunner of kedgeree – is just the stuff for digestive problems and even for babies who are starting on solids.
With no onions, garlic or ginger you’d think it would taste too plain, but this is not the case at all. No need to wait until you’re ill to try it out: have it whenever you want something soothing, flavoursome and ridiculously easy to put together.
I based this on the classic Ayurvedic Institute recipe, except that I used brown basmati and added some dried chilli flakes for a bit of welcoming heat. Also, as you’ll see from the photograph, I forgot to add the turmeric, which is basically down to my inability to notice anything beyond my own bubbling innards.
Oh dear. And there was me saying I wouldn’t go into too much detail.
Ingredients
Brown basmati rice, 1 cup
Moong dahl (yellow split peas), 2 cups
Rapeseed oil, 2 tbsp
Salt
Dried chilli flakes, 1 tsp
Mustard seeds, 3 tsp
Cumin seeds, 2 tsp
Turmeric, 2 tsp
Ground coriander, 2 tsp
Fennel seeds, 2 tsp
Asafoetida, a good pinch
Salt
Whatever vegetables you have to hand, diced (I used carrots, broccoli and sweetcorn)
Coriander to garnish
Wash the dahl and the rice together in a large bowl and drain well.
Heat the oil in a large saucepan and add the spices. Wait until the seeds are popping and then add the dahl and rice. Give it all a good stir together and fry for 1-2 minutes. Add 8 cups of water, bring it to the boil, reduce to a simmer and skim any froth. Season well with salt.
Either let simmer for 40 minutes, until nearly done, or else tip the lot into a slow cooker and cook on high for two hours.
Add in the vegetables about 10-20 minutes before the end to give them time to cook through. Taste and adjust seasoning. Sprinkle with chopped coriander. Let cool slightly before serving.
Serves 2
Prep time: 20 minutes plus 10-15 minutes cooling time for the tofu and fennel

We were at the beach in Porthcawl yesterday when I noticed these tall, spiky plants growing at the edges of the sand. They had curiously edible-looking fronds. You should have seen how smug I was when I crushed some in my fingers and realised it smelt like liquorice.
‘It’s some kind of sea dill!’ I proclaimed.
It wasn’t some kind of sea dill. As it happens, it was wild fennel. This would be beyond obvious to proper foragers but to me, a complete novice, it was a revelation.
Originally I wanted to do Italian-style wild fennel cakes but working out how to replace that amount of cheese was a bit of a challenge without resorting to soy substitutes. Eventually I decided on a classic tofu scramble that borrowed flavour inspiration from the fennel cakes by upping the nutritional yeast content.
It was so yum! And very easy to make. The fennel tasted stronger than the shop-bought variety, and this was a good thing.
The choice of silken tofu is a personal one. Feel free to make this with regular if you prefer a more solid texture.
Ingredients
A bunch of wild fennel, about 6-7 fronds
Silken tofu, one 340g packet
Olive oil, 1 tbsp
Garlic, one clove, finely chopped
Two spring onions, finely chopped
Turmeric, 1/2 tsp
Herbes de Provence, 1/2 tsp
Juice of 1/2 lemon
Nutritional yeast, 2 heaped tbsps
Salt and pepper
Place the block of tofu and the fennel fronds in a pan of water. Bring to the boil and let simmer for ten minutes. Drain well and allow to cool.
Slice the tofu into 1cm cubes. Finely chop the fennel. Heat the oil in a frying pan and add both. Fry for about five minutes, stirring occasionally.
Add in the turmeric, dried herbs, garlic and spring onions. Season well with salt and pepper. Fry for a further four or five minutes, stirring gently, until the tofu has broken down to the texture you prefer – less stirring for big chunks, more for fine crumbs.
Take the pan off the heat, squeeze over the lemon juice and stir in the nutritional yeast.
Serve with chunky toast.
Serves 4
Prep time: 50 mins
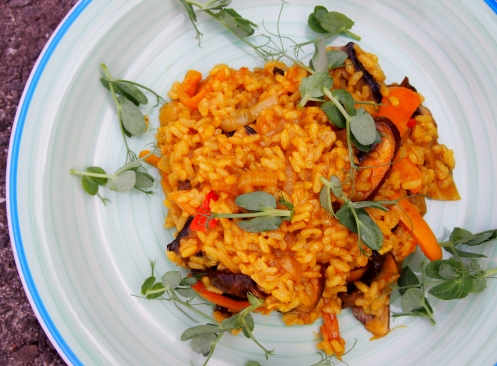
This is a version of Yotam Ottolenghi’s Multi-Vegetable Paella, based on what I happened to have in my fridge last night. I scattered pea shoots over it, which I have grown in a tray from an ancient packet of Leo Peas that had been at the back of my cupboard for a long time. Fresh, crunchy pea shoots and unctuous paella rice go together very nicely.
Ingredients
One large onion, sliced
Garlic, one clove, crushed
Olive oil, 2 tbsp
One large pepper or several small ones, sliced
Two portobello mushrooms, sliced
Paella rice, 350g
Two bay leaves
Turmeric, 1/2 tsp
Smoked paprika, 1/2 tsp
Cayenne powder, 1/2 tsp
Sherry, 100ml
Hot vegetable stock, 900ml
Salt and pepper
To serve: lemon wedges, fresh pea shoots
Heat the olive oil in a large, heavy based frying pan. Add the onion and fry for six or seven minutes, stirring occasionally. Add the peppers and fry for five minutes. Add the mushrooms and fry for five minutes. Add the garlic, fry for another minute, then add the bay leaves, spices and pepper. Stir into the veg and fry for a further two minutes, before pouring in the rice.
Give it all a good stir for a couple of minutes until the rice grains are well coated and translucent. Sprinkle over the sherry and turn up the heat for two minutes for the alcohol to burn off.
Pour in the hot stock and sprinkle over a good few pinches of salt. Turn the heat down and allow to simmer very slowly without stirring for about 30 minutes until nearly all the liquid is absorbed and the rice is cooked.
Serve with lemon wedges and scattered pea shoots.
Serves 3-4
Prep time: 1 hour
A delicate, warm summer salad. Really yum.
Ingredients
Pearl barley, 250g
British asparagus, 125g, thoroughly rinsed
Artichoke antipasto in olive oil, 100g
Spring onions, two, finely chopped
Chick peas, one or two handfuls
Salt and pepper
For the dressing:
Grain mustard, 2 tsps
White wine vinegar, 1 tbsp
Extra virgin olive oil, 4 tbsps
Salt and pepper
Boil the pearl barley in plenty of water for 45 minutes – 1 hour until soft with a little bit of bite.
Make up the dressing: whisk ingredients together until they emulsify, or shake in a lidded jam jar. Taste and adjust flavour.
Break the asparagus tips at the point where they naturally snap, and add to the water with the barley during the last two minutes.
Drain, and toss with the dressing and remaining ingredients. Adjust seasoning as necessary.
Makes about 1.5 litres
Prep time: five minutes, plus 24 hours steeping time

I am making forays into foraging. Half of me has always wanted to get into foraging. The other half of me was too worried about dog pee. Also, if I’m being honest, that other half of me was rather lazy. Anyway, this summer I have dusted off my copy of Richard Mabey’s Food For Free and, in the long hours pushing the buggy round the park while the baby refuses to sleep, have been eyeing up the various plants around me in a greedy way.
Until recently I had never ventured further than the odd expedition scrumping for late-summer blackberries or late-spring garlic greens. These episodes were always fun, with an initial half hour or so of extreme enthusiasm from my eldest daughter, rapidly fading to whingeing, trudging, can-we-go-home-now floppiness. Ah, children.
I wondered whether the pretty white flowers I was seeing everywhere might be elderflowers. Well it turns out they were. Once I had worked that out, I started seeing their frothy heads everywhere – in hedges, on roadsides, alongside train tracks – all over the place, especially in the city.
 So – elderflower cordial. Finding citric acid is much more difficult than finding elderflowers. If you can persuade your local chemist that you don’t want it for the purposes of jacking up hard drugs, then good luck to you. Personally I opted to buy some online from a home brewing company.
Once you’ve scored your citric acid the rest is easy. And so cheap! I costed up my batch of cordial and compared it with the quality shop-bought variety. Belvoir cordial is £2.89 for 500ml – 500ml of mine, 71p. Ha! Smug.
Elderflower cordial with sparkling water and a slice of lemon is the most refreshing thing it’s possible to drink on a hot summer’s day. I hear you can even make it without the citric acid, as long as you don’t mind drinking it quickly, which won’t be at all difficult.
Elderflower cordial (based on the recipe in Richard Mabey’s Food For Free)
Boiling water, 750ml
White sugar, 1kg
10 elderflower heads
One lemon
Citric acid, 25g
Cut your elderflower heads so there is a little bit of stem left. Lay them out flat for an hour or so to encourage any beasties to leave home. Don’t be tempted to wash the flowers though as you’ll lose all that precious flavour.
Pour the sugar into a large bowl and add the boiling water. Stir until the sugar is dissolved. Add the elderflower heads and citric acid. Pare the rind off the lemon with a vegetable peeler, chop the lemon into chunks and add along with the rind.
Leave for 24 hours to steep, stirring occasionally. Strain through muslin and pour into clean bottles. The cordial should keep for about six months.
Serves 4
Prep time: 40 minutes
This is the single best way I can think of to eat an aubergine. And I really love aubergines.
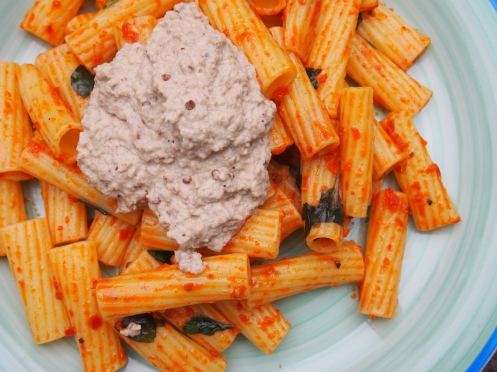
It might not look like anything special but I promise you that the flavours are out of this world. Looking at the list of ingredients you’d think it wouldn’t work, but the thing is, it does, in so many ways. Tomato, tahini – I know. Just try it and see.
Ingredients
Tortiglioni or your favourite shape of pasta, 500g
Sun dried tomato paste, 100g
Garlic, one clove, crushed
A large handful of basil leaves
Salt and pepper
Possibly, some extra virgin olive oil
For the baba ghanoush:
One aubergine
Juice of one lemon
Tahini, 2 tbsp
Extra virgin olive oil, 2 tbsp
Garlic, one clove
Salt and pepper
First char your aubergine. This is easiest if you have a gas hob. Line the hob with tinfoil to catch drips, then lay your aubergine directly over a medium/low naked flame. Turn it every few minutes until it is blackened all over. It should take about 20 minutes.
This sounds like a hassle but it’s really straightforward enough and the eventual flavour will knock you right out. If you don’t have a gas hob, you can achieve the same thing under a grill or (best of all) on a barbecue.
In the meantime boil a large pan of salted water and cook your pasta until al dente.
When the aubergine is done let it drain in a sieve for 10 minutes. Then take it to a chopping board and slice it down the middle lengthwise. Scoop out the inner flesh, discarding the burnt bits. Blend the aubergine flesh along with the garlic, tahini, lemon juice, olive oil and salt and pepper. The texture shouldn’t be too smooth. Test and add more salt or lemon juice if you think it needs it.
When the pasta is done, drain and toss with the sun dried tomato paste, crushed garlic, and salt and pepper. Rip up the basil and stir it all together. Add one or two tbsps of olive oil if it looks like it needs it.
Serve the baba ghanoush in a big blob over each pile of pasta or – if you don’t mind it looking a bit messy – just stir the lot in together, since that’s how it will end up once you start eating anyway.


